For your last assignment the emphasis will be on the testing and implementation of our last big data structure, Graph, and a cool application that will require you to use this and several other data structures and algorithms we’ve covered this semester. You’ll implement the graph interface we reviewed in lecture using the incidence list representation. This representation is very memory-efficient for sparse graphs, something we’ll need for our application: you will be touring the streets of Baltimore to find the shortest route from the JHU campus to other destinations around Baltimore. This will require you to implement Dijkstra’s algorithm for weighted shortest paths.
To solve this, we have provided for you a street map of Baltimore around the JHU campus. The original data was provided by the City of Baltimore although we have focused it on a smaller region to make it more manageable. We have also simplified the formatting to make it easier to parse, although the GPS coordinates and street names are real.
The street map data is available in the file baltimore.streets.txt. Here are the first few lines of the file:
-76.6254,39.3373 -76.6255,39.3373 21.5510 39256:W_UNIVERSITY_PKWY
-76.6443,39.3096 -76.6443,39.3099 133.363 1530:1800_BLK_N_WOODYEAR_ST
-76.6177,39.3293 -76.6175,39.3292 70.8768 38350:E_34TH_ST
-76.6457,39.3149 -76.6454,39.3151 120.759 41431:AVALON_AVE
-76.6568,39.3244 -76.6569,39.3243 44.6691 37858:WAHOTAN_AVE
-76.6071,39.3115 -76.6061,39.3116 285.046 31155:800_BLK_E_NORTH_AVE
Each line in the file defines a road segment. The first pair of numbers represents the GPS coordinates (longitude and latitude) of the beginning of the road segment, the second pair of numbers is end of the road segment, the next number is the length of the road segment in meters, and the final field is the name of the road segment. All of the road segment names start with a unique integer index (the same index that is used on the City of Baltimore website), although not every road segment has an english name.
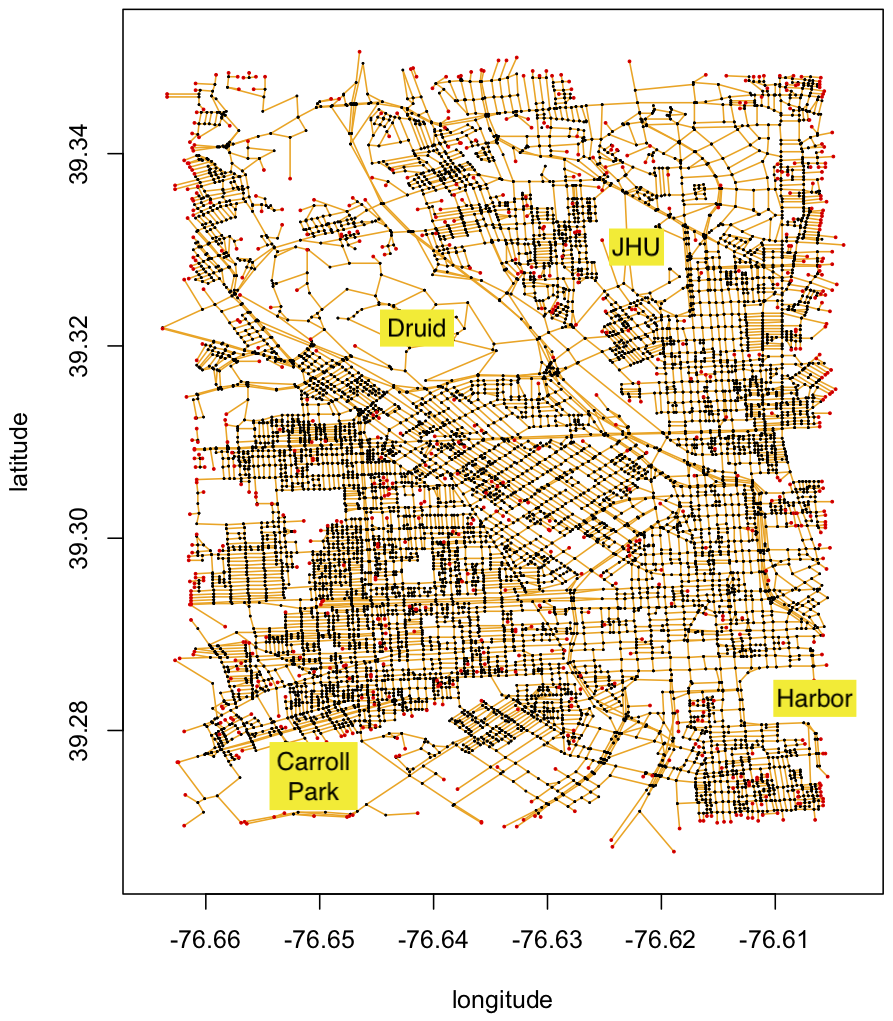
Notice that this is an edge-oriented representation of the street network graph: nodes in the graph are intersections, and the edges represent the road segments that connect the intersections. Some of the road segments form deadends, especially alleys that don’t connect to other roads. Note that while we are using GPS coordinates to define the start and end of each road segment, you can treat them as strings! However, For reference, we have plotted the roadmap file here:
The orange lines represent the data in the baltimore.streets.txt file. The black dots highlight intersections where two or more road segments come together. The red dots highlight when a road segment does not intersect any other road segments. We have also highlighted a few landmarks (JHU, the Harbor, Druid Park, and Carroll Park) to orient you to the road map.
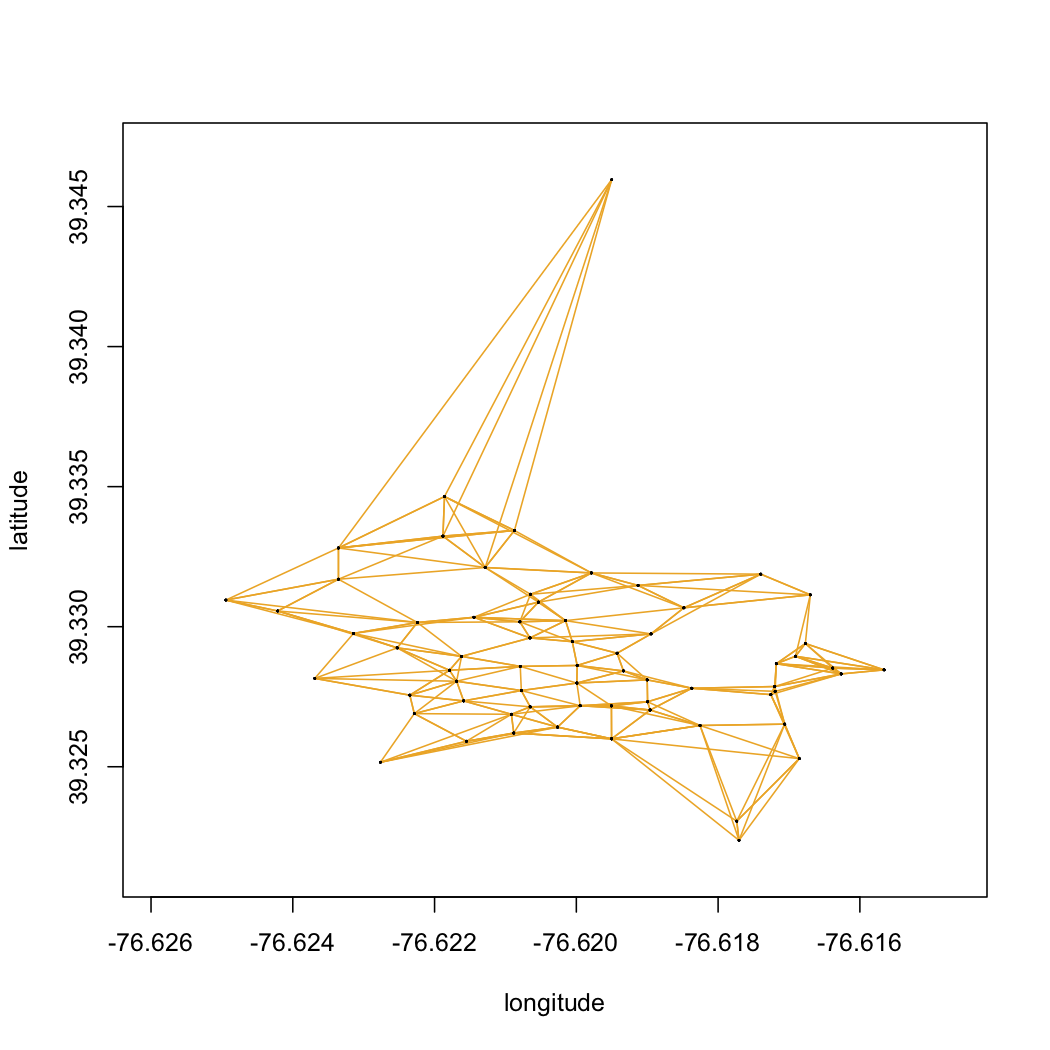
We have provided a smaller file representing the walking paths of the JHU campus called campus.paths.txt. It follows the same formating as the larger street map, but can be useful for testing purposes.
We are once again providing a full skeleton for this assignment, imposing our design on you and sparing you from figuring out input parsing. This includes several interfaces which of course you may not modify, and a starter implementation file for you to complete. We are also providing data files, and a starter application program to get the input. Unlike recent assignments, there won’t be a performance or benchmarking component to this one. Instead the emphasis is on the ADT implementation and application, with some extra algorithmic work. We will be using some custom exception classes as well.
You’ll need to write the usual JUnit 4 tests for the Graph<V,E> interface, as abstract class GraphTest. We’ve provided the concrete class SparseGraph that extends it for the implementation.
Below is the expected package hierarchy and files as the autograder will use them. Files you will be editing are marked with an asterisk (*).
---
hw8-student.zip
---
data/
    baltimore.streets.txt
    baseball.txt
    broken.txt
    campus.paths.txt
exceptions/
    InsertionException.java
    PositionException.java
    RemovalException.java
hw8/
    Edge.java
    SparseGraph.java *
    Graph.java
    StreetSearch.java *
    Vertex.java
    tests/
        GraphTest.java *
SparseGraphTest.javaYour first task for this assignment is to develop an “efficient” implementation of the Graph<V, E> interface for directed graphs. You’ll follow the basic design for a linked representation in the form of incidence lists that we outlined in lecture. Your class implementing the Graph<V, E> interface should be called SparseGraph<V, E>.
We put “efficient” in quotes above because while the ideal is that all graph operations take O(1) time, the reality is that at least some operations will take more. For example, when inserting an edge you need to check for duplicate edges which may take O(d) where d is the indegree/outdegree of the vertices in question. Similarly, when removing an edge, you need to find the edge you’re removing in the incoming/outgoing edge lists of the vertices in question, again something that might take O(d) time. Think about how you can represent these incidence lists in a way that will take O(1) expected time instead! Finally, depending on what you use internally to represent the various lists, you may have to make copies as part of operations like vertices or outgoing as discussed in a big comment in Graph.java.
As part of your SparseGraph<V, E> implementation, you will need two private classes, one to represent vertices, the other to represent edges. Some things are easier with nested classes, other things are easier with inner classes. Rather than make you struggle with this decision, our skeleton code uses inner classes. In theory you could rewrite the provided code with nested classes, but we don’t recommend taking on any additional work.
Often there can be some serious pain as you navigate the weird world of nested/inner classes with several type parameters. Pay attention to the provided convert methods we’ve written for you. For example, casting from a Vertex<V> interface to your private class will most likely lead to an “unchecked cast” warning. As a special exemption from the usual rule regarding warnings, you’re allowed to have two of these “unchecked cast” warnings for free on this problem! Not because we like them, but because the way to make them disappear is shrouded in deep mystery (short of using @SuppressWarnings which you’re not allowed to do).
Note that you are allowed (in principle anyway) to use the Java collection classes java.util.List, java.util.ArrayList, and java.util.LinkedList. However, using these will cause iterator complications that you’ll have to deal with. See the long comment regarding iterators in the Graph<V, E> interface.
Your SparseGraph<V, E> implementation should come with a full suite of JUnit 4 test cases in a file GraphTest.java. Be sure to test all public methods and be sure to test all exceptions for error situations as well. You are welcome to add more tests to SparseGraphTest.java if there are things specific to the implementation that you want to test, but we’re not grading for that.
Finally, your SparseGraph<V, E> class has a special toString() method as well. For a simple Graph<String, Integer> into which the vertices A and B as well as an edge 7 from A to B have been inserted, the string returned by toString() should have the following format:
digraph {
  "A";
  "B";
  "A" -> "B" [label="7"];
}
Note that it is very important that you keep this format exactly as given, curly braces and quote marks and all. Also, notice that all the vertices are output first, then all the edges. If you want you can stop reading this part of the assignment now; but if you are curious why we picked this format, read on.
The strange format for “printing” the graph is useful because various tools in the GraphViz package can be used to turn those strings into “actual” graphs:
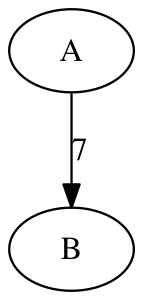
This particular image was made by running the command
$ dot -Tpng graph.dot >graph.pngwith graph.dot containing the string shown above. Note that you’re not required to do anything in particular with GraphViz for this problem, just follow the format as described and you’ll be fine. (But again, if you’re curious to try, you can install graphviz for yourself.)
The second problem is to apply your SparseGraph implementation to representing the street maps. You should strive for an efficient implementation for inserting and searching for roads and intersections. You are allowed to use the Java collection classes java.util.List, java.util.ArrayList, java.util.LinkedList, and java.util.HashMap to simplify your implementation.
You’ll also need to implement Dijkstra’s algorithm to find the shortest path between two locations within a street graph. To simplify the coding, you can assume that the graph search will start and end at intersections between different road segments, and not arbitrary GPS coordinates.
For this part you’ll be writing the missing functions in the provided StreetSearcher.java file. Be sure to not change any of the methods since our test code will be calling these methods directly. You do not need to submit JUnit test code for this file but accuracy will be very important to get Part C correct! For this part of the problem you are allowed to use java.util.PriorityQueue.
The program takes three command-line arguments: the name of the input data file, the starting intersection coordinates and the destination coordinates. The output should print to standard out the total path distance followed by the names and lengths of the roads taken. For example, when searching the campus map this would be the path from Malone Hall to the Undergraduate Teaching Labs (# roads updated 4/22).
$ java StreetSearcher campus.paths.txt -76.620883,39.326204 -76.620647,39.331158
Network Loaded!
Loaded 414 roads
Loaded 65 endpoints
Total Distance: 599.0427883190066
Malone_Hall--Shriver_Hall 58.16225478578063
Shaffer_Hall--Shriver_Hall 89.26249532106544
Maryland_Hall--Shaffer_Hall 90.0868664408058
Maryland_Hall--Krieger_Hall 69.82039980173397
Remsen_Hall--Krieger_Hall 94.57560573433979
Remsen_Hall--Dunning_Hall 84.02193188902837
Undergraduate_Teaching_Labs--Dunning_Hall 113.11323434625268
If an endpoint is invalid (shown here as XXX and YYY), your code should print:
$ java StreetSearcher campus.paths.txt XXX YYY
Network Loaded!
Loaded 414 roads
Loaded 65 endpoints
Invalid Endpoint: XXX
If there is no path between endpoints, your code should print:
$ java StreetSearcher broken.txt 1 4
Network Loaded!
Loaded 8 roads
Loaded 5 endpoints
No path foundThe final problem does not require implementing any new code, but will be to analyze the run time and memory requirements to find the shortest path between different locations. Specifically you should use xtime.java to record the running time and memory requirements to search between these different locations:
  JHU to 7-11
  Starting location: -76.6175,39.3296
  Ending location: -76.6214,39.3212

  JHU to Druid Lake
  Starting location: -76.6175,39.3296
  Ending location: -76.6383,39.3206

  JHU to the Inner Harbor
  Starting location: -76.6175,39.3296
  Ending location: -76.6107,39.2866
In your README be sure to comment on how the memory and times vary for the different queries – the main question is why does it change when searching the exact same graph. Make sure to also report the total length (in meters) between the locations, and the names of the road segments used. If your program fails to find a path, please report this as well, and explain why you think it did not find a path.
Our strong advice is to start very small, even if that means creating a tiny graph with 4 or 5 road segments Then gradually work up to the larger ones as you become more sure things are working well. Then and only then should you try the full dataset.
[Note: if you are working in a virtual environment you may need to increase the RAM available to the virtual machine a bit. You can do this on the “System” tab of the Lubuntu Settings within the VirtualBox app.]
Go to the appropriate assignment page for Gradescope and click submit. Note that you can resubmit any time up until the deadline. You will be prompted to upload your files at which point you will upload all of the necessary source files. You must build your solution with our provided interfaces. We will use our own versions, so no changes are permitted and you don’t need to submit them. Your submission must include the following files you are developing:
  README
  SparseGraph.java
  StreetSearch.java
  GraphTest.java
You need to submit all of these files to the autograder along with a README. You can upload them individually or in a zip file. If you upload them in a zip file make sure they are all at the top level, you cannot have any extra directories or else the autograder won’t be able to find them. This even applies to any test files - do not submit in a tests subdirectory!
Make sure the code you hand in does not produce any extraneous debugging output. If you have commented out lines of code that no longer serve any purpose you should remove them.
You must hand in the source code and a README file. The README file can be plain text (README with no extension), or markdown (README.md). In your README be sure to answer the discussion questions posed in this description. You should discuss your solution as a whole and let the staff know anything important. If you are going to be using late days on an assignment, we ask that you note it in your README.
If you want to learn markdown formatting, here is a good starting point.
Once you are ready to submit your files, go to the assignment page on Gradescope and click submit. Note that you can resubmit any time up until the deadline. Only your most recent submission will be graded. Please refer to course policies as far as policies regarding late days and penalties.
After you submit, the autograder will run and you will get feedback on your functionality and how you performed on our test cases. Some test cases are “hidden” from you so you won’t actually know your final score on the test cases until after grades are released. We also include your checkstyle score as a test case.
If you see the “Autograder Failed to Execute” message, then either your submission did not compile at all or there was a packaging error. Please see the Gradescope Submission Notes in Piazza Resources for help debugging why your submission is not working.
You do not need to fully implement each file before you submit, but you’ll probably fail the test cases for the parts of the assignment you haven’t done yet. Also note that only the files with // TODO items in them will be used. You cannot modify any of the provided interface files as the autograder will overwrite any changes you made with the original provided file.
For reference, here is a short explanation of the grading criteria; some of the criteria don’t apply to all problems, and not all of the criteria are used on all assignments.
Packaging refers to the proper organization of the stuff you hand in, following both the guidelines for Deliverables above as well as the general submission instructions for assignments.
Style refers to Java programming style, including things like consistent indentation, appropriate identifier names, useful comments, suitable javadoc documentation, etc. Many aspects of this are enforced automatically by Checkstyle when run with the provided configuration file.
public, protected, and private appropriately, etc.). Simple, clean, readable code is what you should be aiming for.Testing refers to proper unit tests for all of the data structure classes you developed for this assignment, using the JUnit 4 framework as introduced in lecture. Make sure you test all parts of the implementation that you can think of and all exception conditions that are relevant.
Performance refers to how fast/with how little memory your program can produce the required results compared to other submissions.
Functionality refers to your programs being able to do what they should according to the specification given above; if the specification is ambiguous and you had to make a certain choice, defend that choice in your README file.
If your submission does not compile, you will not receive any of the autograded-points for that assignment. It is always better to submit code that at least compiles. You will get freebie points just for compiling.
If your programs have unnecessary warnings when using javac -Xlint:all you will be penalized 10% functionality per failed part. (You are also unable to use the @SuppressWarnings annotation - we use it just to filter our accepted warnings from yours.)
If your programs fail because of an unexpected exception, you will be penalized 10% functionality per failed part. (You are not allowed to just wrap your whole program in to a universal try-catch.)