
Complete SVM visualization applet instruction manual
Table of contents
1. INTRODUCTION
2. PART 1 - CONTROL AREA
3. PART 2 - THE PLANE
4. ADVANCED TOPICS
1. INTRODUCTION
As a learning tool in for a graduate student level course, this applet embraces the goal to offer a complete, one-stop visualization center to familiarise yourself with the SVM concept and its underlying. It offers an intuitive, 2D plane based approach to SVM where the user can view the results almost real time. It offers the opportunity for the user to see the impact of the often misunderdstood kernel function parameters on the classifier.
This applet is seperated in three different parts:
Part 1 is the control area. This is where the user controls the behaviour of the classifier. Presets for the plane can be chosen. He can also choose the kernel function to be used by the classifier. Four choices are available. As a kernel function is chosen, the kernel parameters area adapts itself automatically, waiting for the proper parameters to be entered.
Part 2 is called "the plane". This is where instances to train the SVM can be entered manually (using the mouse) or using the presets hardcoded in the applet.
Part 3 is the kernel information area. This area is used to brief the user about the kernel function he chose and the possible values he shall enter to optimize his classifier.
2. PART 1 - CONTROL AREA
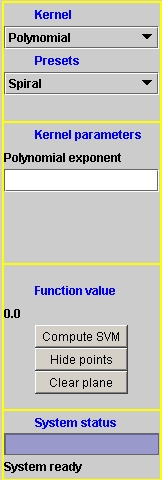 |
The "Kernel" list box is the selection of kernel functions available. There are four choices: Polynomial , Gaussian RBF, Sigmoïd and the experimental KMOD. The "Presets" box gives the user the choice between five different instances presets. These presets represent patterns entered on the plane (part 2). The 2-way spiral, an oval, concentric ovals, a 2-by-2 chessboard and a random grouping are available. This dialog area shows the different kernel function parameters and changes dynamically with the kernel selection. Their corresponding mathematical name is also represented.
The function value returns the classifier value for the pixel under the mouse when the mouse is on the plane. The "Compute SVM" button computes the SVM once all parameters for the computation (kernel function, kernel parameters, training instances) were set up. "Hide and Show points" only hides the instances from the display, but are still present in the training set. "Clear plane" clears the plane, removing instances from the training set "System status" returns the computation status, "Work in progress" is shown when computing. |
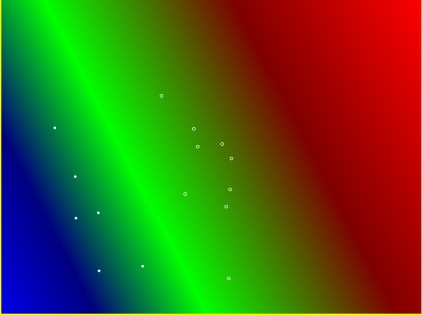
3. PART 2 - THE PLANE
This is the area where instances are shown and selected. Two ways are available for the user to enter instances in the training set. By selecting a preset from the "Presets" list in the part 1 or by clicking with the mouse directly on the plane. Left mouse click enters positive examples, shown with a full dot and right mouse click enters negative example then shown with an empty dot.

Remember that Presets selected by the list are ADDITIVE to the board, so you can mix patterns and manually add instances with the mouse to a currently shown pattern. To clear everything out, click the "Clear plane" button.
Once all parameters have been supplied to the classifier and training instances were entered on the plane, the user clicks "Compute SVM" revealing the classifier...
This example is for a linear classifier with instances entered manually
4. ADVANCED TOPICS
After training the classifier, it outputs to the Java console the hyperplane equation and a few other information about the SVM. By clicking on the coffee cup icon or the pinguin icon in your task tray, you can access the console. The output for a linear classifier would look like this:
SMO
Machine linear: showing attribute weights, not support vectors.
-10.573836817408832 * x
+ 4.524558327643771 * y
- -1.0545314129484162
Number of support vectors: 3
Number of kernel evaluations: 70